# 使用Gitbook制作发布个人的电子书籍

# 需求说明
Gitbook可以人每个人制作发布个人的电子书籍,并能最大程度上利用“群智”提高阅读品质和享受创作过程。
gitbook.com网站是一个简单的个人在线书籍网站,在这里可以把自己的文档整理成一本书发布出来,便于阅读,gitbook提供了两套方案,
1.可以直接在gitbook官网上申请账号进行创建。
2.通过他们提供的命令行开发工具自己构建一个。
咱们下面介绍的是第二套方案,gitbook命令行工具首先需要服务器上有node.js,https://nodejs.org/zh-cn/download/
# 系统说明
系统: Centos7

IP: 192.168.1.5(云服务器)

地址: https://g.xgss.net/

Github Page地址: gitbook.xgss.net

github仓库:https://github.com/funet8/book.git
2
3
4
5
6
7
8
9
10
# 一、 安装nodejs
# yum方式安装nodejs和npm
nodejs版本不要安卓过高,笔者安装的是nodejs v8版本的,否则会报错:安装的v14.17.6有报错:
      if (cb) cb.apply(this, arguments)
TypeError: cb.apply is not a function
    at /usr/local/node-v14.17.6/lib/node_modules/gitbook-cli/node_modules/npm/node_modules/graceful-fs/polyfills.js:287:18
    at FSReqCallback.oncomplete (fs.js:193:5)
2
3
4
1 更新node.js各版本yum源
Node.js v8.x安装命令
curl --silent --location https://rpm.nodesource.com/setup_8.x | bash -

Node.js v7.x安装命令
curl --silent --location https://rpm.nodesource.com/setup_7.x | bash -

Node.js v6.x安装命令
curl --silent --location https://rpm.nodesource.com/setup_6.x | bash -

Node.js v5.x安装命令
yum安装node.js
# yum install -y nodejs

# node -v
v8.17.0
# 安装cnpm(对自己网络有信心的大佬可以无视)
因为国内比较慢,我们可以额外安装淘宝的cnpm,慢的时候用cnpm.
# npm install -g cnpm --registry=https://registry.npm.taobao.org
# 二、安装gitbook-cli工具
gitbook-cli是一个在同一系统上安装和使用多个版本的GitBook的实用程序。并自动安装所需版本的GitBook来生成一本书。 执`npm install gitbook-cli -g终端命令进行的安装。
# npm install gitbook-cli -g
可通过gitbook --version验证,如果提示没有此命令需要输入绝对路径,或者创建软链接
# gitbook --version
CLI version: 2.3.2
Installing GitBook 3.2.3
2
3
注意:终端第一次运行gitbook命令,可能会自动安装gitbook,因为刚才安装的是CLI,然后CLI会自动安装gitbook。
如果想卸载CLI,可使用 npm uninstall gitbook-cli -g来删除。
当然,GitBook 的远比我们想象的强大,我们还可以通过 gitbook help 来查看:
# gitbook help
# 初始化一本书
初始化一本书的命令是gitbook init,
首先在终端创建一个项目目录,并进入这个目录:
~ mkdir git_book
~ cd git_book
~ gitbook init
gitbook init会在空项目中创建README.md和SUMMARY.md两个文件:
README.md文件是项目的介绍文件。
SUMMARY.md是gitbook书籍的目录。
2
3
4
5
6
如果SUMMARY.md文件里面有如下内容:
vim SUMMARY.md
* [项目介绍](README.md)
* http
    * [http说明](doc/http/http解析.md)
        * [tcp说明](doc/http/tcp/tcp说明.md)
            * [udp说明](doc/http/tcp/udp/udp说明.md)
* HTML
    * [HTML5-特性说明](doc/html/HTML5-特性说明.md)
2
3
4
5
6
7
8
本地启动服务编写书籍
终端打开项目目录,使用gitbook serve启动服务:
gitbook serve
然后根据终端的提示,在浏览器中打开http://localhost:4000查看书籍
# 三、Gitbook使用教程
gitbook网站是一个简单的个人在线书籍网站,在这里可以把自己的文档整理成书籍发布出来,便于阅读。
# 1.准备
在此之前你需要会如下准备:
1.账号: github有账号,gitbook使用github账号注册 (gitbook网站有时需要使用代理才能打开) 2.git:代码管理工具 3.Markdown:gitbook主要使用MD语法来编写书籍的 4.gitbook工具:如果你在本地开发需要安装此插件,下面有介绍 5.nodejs环境:gitbook插件需要的运行环境 6.一款Markdown编辑器:方便本地开发,推荐Typora或gitbook自己的编辑器gitbook editor
# 2. 在gitbook网站上创建一本文档书籍
此种方式是使用github网站加gitbook网站的方式来创建书籍的。 首先你要有一个github账号,然后在github网站中创建了一个repo仓库,用于存放书籍内容的仓库。
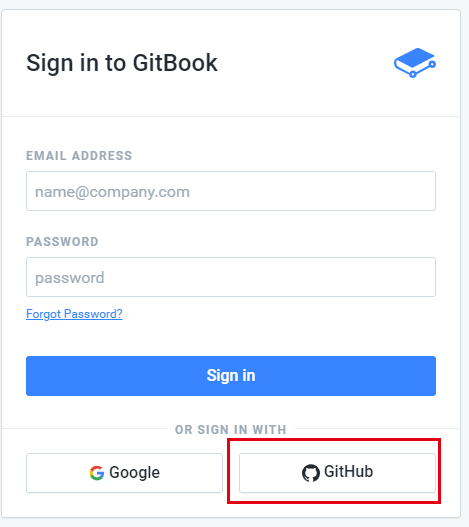
# 3.登陆gitbook网站
gitbook网站支持直接使用github账号登陆的,推荐直接使用github账号登陆。 点击右上角的Sign In登陆,然后选择Sign in with GitHub选择使用github账号进行登陆。 第一次登陆www.gitbook.com网站时,需要github网站的认证,还需要到注册github网站的邮箱中点击确认。
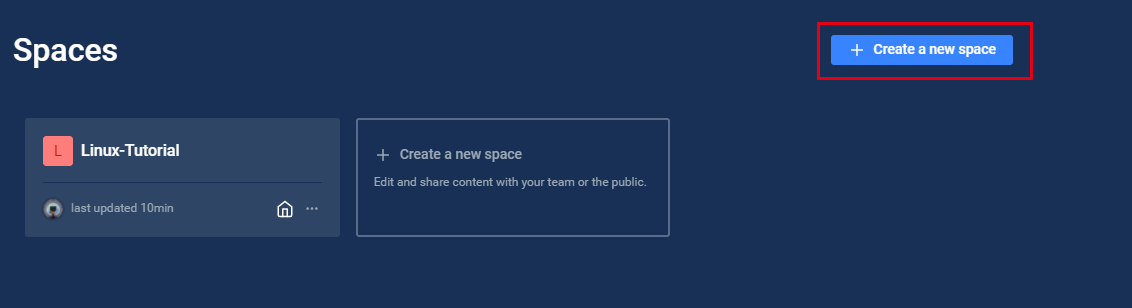
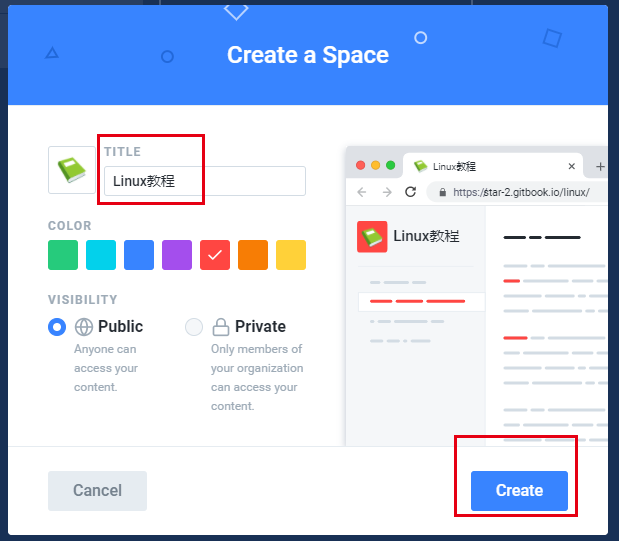
# 4.创建一本书
登陆网站后,点击右上角的用户图标,然后选择create a new space
在创建书籍中选择github,点击左侧的 “integations”集成,选择github,再点击 list all repositories

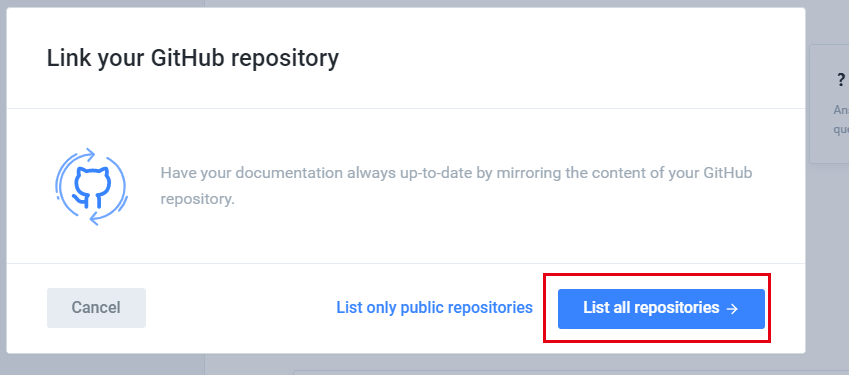

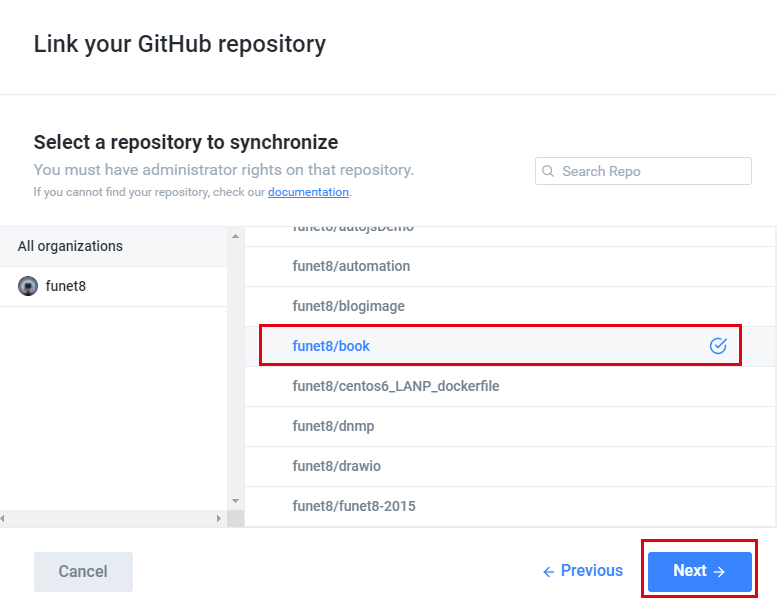
必须要有分支
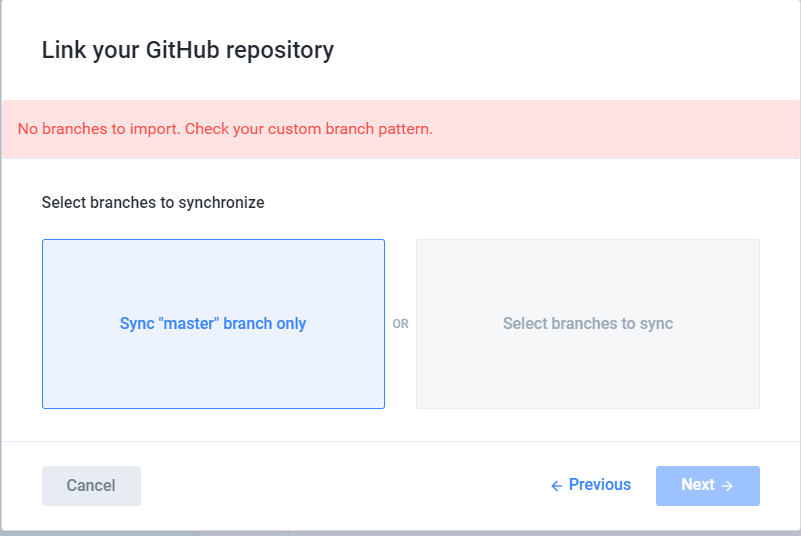
# 5.克隆并且新建一个分支
新建一个 gitbook.xgss.net的分支,将这个分支
$ git clone git@github.com:funet8/book.git
$ cd book
$ git branch gitbook.xgss.net
$ git branch
推送本地分支到远程
git push origin gitbook.xgss.net

合并某分支到当前分支:
git checkout master
git merge develop
2
3
4
5
6
7
8
9
10
11

最终效果
https://app.gitbook.com/@star-2/s/linux/v/gitbook.xgss.net/
# 6.初始化一本书
git clone git@github.com:funet8/book.git
cd book
gitbook init

warn: no summary file in this book
info: create README.md
info: create SUMMARY.md
info: initialization is finished

gitbook init会在空项目中创建README.md和SUMMARY.md两个文件:
README.md文件是项目的介绍文件。
SUMMARY.md是gitbook书籍的目录。
2
3
4
5
6
7
8
9
10
11
12
如果SUMMARY.md文件里面有如下内容:
# vim SUMMARY.md
* [项目介绍](README.md)
* http
    * [http说明](doc/http/http解析.md)
        * [tcp说明](doc/http/tcp/tcp说明.md)
            * [udp说明](doc/http/tcp/udp/udp说明.md)
* HTML
    * [HTML5-特性说明](doc/html/HTML5-特性说明.md)
2
3
4
5
6
7
8
本地启动服务编写书籍
终端打开项目目录,使用gitbook serve启动服务:
# gitbook serve
Live reload server started on port: 35729
Press CTRL+C to quit ...

info: 7 plugins are installed

Error: Couldn't locate plugins "search-pro, back-to-top-button", Run 'gitbook install' to install plugins from registry.
# gitbook install
# gitbook serve
Starting server ...
Serving book on http://localhost:4000

开启端口:
iptables -A INPUT -p tcp --dport 4000 -j ACCEPT
service iptables save
systemctl restart iptables.service
systemctl enable iptables.service

注意:gitbook serve命令会在项目中生成一个_book的文件夹,此文件夹就是最终生成的项目。
2
3
4
5
6
7
8
9
10
11
12
13
14
15
16
17
18
19
浏览器中输入:http://192.168.1.5:4000 打开
# 7.文档打包
可使用 gitbook build命令来生成最终的项目:
# gitbook build
info: 9 plugins are installed
info: 6 explicitly listed
info: loading plugin "search-pro"... OK
info: loading plugin "back-to-top-button"... OK
info: loading plugin "highlight"... OK
info: loading plugin "sharing"... OK
info: loading plugin "fontsettings"... OK
info: loading plugin "theme-default"... OK
info: found 2 pages
info: found 2 asset files
info: >> generation finished with success in 0.4s !
2
3
4
5
6
7
8
9
10
11
12
命令执行结束后,会在项目下生成_book的文件夹,此文件夹就是最终生成的项目。 在_book文件夹里有一个index.html文件,这个文件就是文档网站的HTM入口,把_book文件夹复制到服务器,然后把web服务的入口引向index.html即可完成文档网站的部署。
如果你想查看输出目录详细的记录,可使用gitbook build ./ --log=debug --debug来构建查看。
# 8. 生成电子书(报错暂时不操作)
GitBook 可以生成一个网站,但也可以输出内容作为电子书(ePub,Mobi,PDF)。
# Generate a PDF file
$ gitbook pdf ./ ./mybook.pdf
提示报错:  InstallRequiredError: "ebook-convert" is not installed.


# Generate an ePub file
$ gitbook epub ./ ./mybook.epub

# Generate a Mobi file
$ gitbook mobi ./ ./mybook.mobi
2
3
4
5
6
7
8
9
10
11
# 9.项目部署到GitHub Pages
这部分需要使用git和github网站,如果你不会,请自行在网上搜索文档查看。
由于gitbook生成的项目跟文档的源码是两个部分,所以可以把文档放到master分支上,部署的网站放到gh-pages 分支。
# 10.在github上创建一个仓库
这个仓库用于存放你编写的项目,和部署项目,如何创建请自行查找。
笔者使用的是 https://github.com/funet8/book.git
# 11.本地项目提交到github仓库
在项目中创建一个.gitignore文件,内容如下:
vim .gitignore
# 忽略gitbook生成的项目目录
_book
2
3
然后终端打开项目,输入如下命令,来提交文档项目到github上:
~ git commit -m '初始化gitbook本地项目'
~ git remote add origin git@github.com:funet8/book.git
~ git push -u origin master
2
3
上面命令执行结束后,就会把代码提交到github上的仓库。 注意仓库地址要替换成你自己的链接。
# 12.生成项目并上传到github仓库的gh-pages分支
由于打包命令太多,为了简单化,现在写一个脚本命令来自动执行。当然你也可以终端自己执行这些命令。
为了部署方便,可以创建一个脚本文件gitbook_xgss_com_gh_pages.sh ,功能将_book目录推送到git仓库中的 gh-pages分支
内容如下:
vim gitbook_xgss_com_gh_pages.sh
#!/usr/bin/env sh
## 将 _book目录推送到git仓库中的 gh-pages分支

# 定义仓库地址
Git_Url='git@github.com:funet8/book.git'

echo '开始执行命令'
# 生成静态文件
echo '执行命令:gitbook build .'
gitbook build .

# 进入生成的文件夹
echo "执行命令:cd ./_book\n"
cd ./_book

# 初始化一个仓库,仅仅是做了一个初始化的操作,项目里的文件还没有被跟踪
echo "执行命令:git init\n"
git init

# 保存所有的修改
echo "执行命令:git add -A"
git add -A

# 把修改的文件提交
echo "执行命令:commit -m 'deploy'"
git commit -m 'deploy.sh'

# 如果发布到 https://<USERNAME>.github.io/<REPO>
echo "执行命令:git push -f $Git_Url master:gh-pages"
git push -f $Git_Url master:gh-pages

# 返回到上一次的工作目录
echo "回到刚才工作目录"
cd -
2
3
4
5
6
7
8
9
10
11
12
13
14
15
16
17
18
19
20
21
22
23
24
25
26
27
28
29
30
31
32
33
34
35
执行成功后,打开你的github仓库,然后选择branch分支,会发现多了一个gh-pages分支,打开这个分之后,里面会有一个index.html文件。说明部署的代码上传成功了。 注意:如果没有gh-pages分支说明没有部署成功请查看刚才执行的终端看哪里报错了,解决报错直到成功部署。
编写shell脚本 gitbook_xgss_com_main.sh ,功能将推送到git仓库中的 main主分支,再合并到 gitbook.xgss.net分支上
vim gitbook_xgss_com_main.sh
#!/bin/bash
## 功能将推送到git仓库中的 main主分支,再合并到 gitbook.xgss.net分支上

NowTime=`date +%Y%m%d-%H:%M:%S`

echo '切换到主分支'
git checkout main
echo '提交当前目录下的所有文件'
git add .

echo '注释添加到当前分支'
git commit -m "脚本自动提交,时间:$NowTime"

echo '提交到远程仓库'
git push

# 合并某分支到当前分支
git checkout gitbook.xgss.net
git merge main
git push
echo '切回主分支'
git checkout main
2
3
4
5
6
7
8
9
10
11
12
13
14
15
16
17
18
19
20
21
22
23
# 13.配置GitHub Pages显示网站
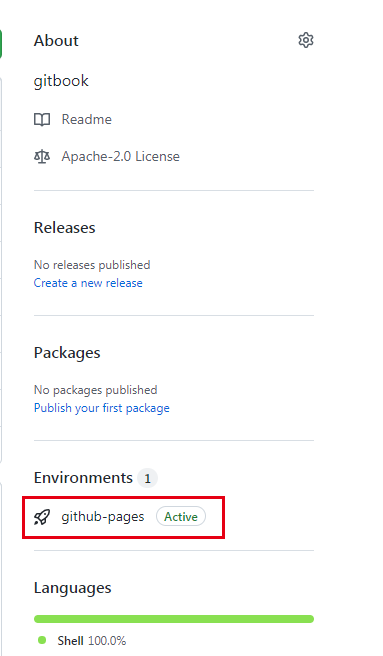
通过浏览器可以访问:https://funet8.github.io/book/
# 14.gitbook的配置文件讲解
如果你想对你的网站有更详细的个性化配置或使用插件,那么需要使用配置文件。 配置文件写完后,需要重启服务或者重新打包才能应用配置。 gitbook的配置文件名是book.json,首先在项目的根目录中创建book.json文件。 book.json主要内容:
{
"title": "我的一本书",
"author" : "yu",
"description" : "我第一本书的描述,很好",
"language" : "zh-hans",
"structure": {
"readme": "introduction.md"
},
"plugins": [
"-lunr",
"-search",
"search-pro",
"back-to-top-button"
],
"pluginsConfig": {
"anchor-navigation-ex": {
"isShowTocTitleIcon": true
}
},
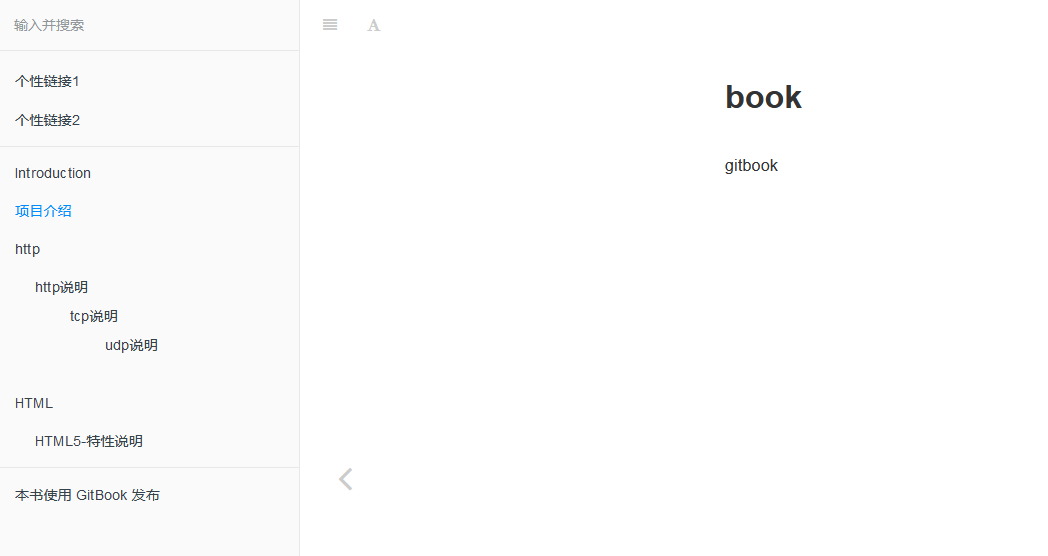
"links" : {
"sidebar" : {
"个性链接1" : "https://www.baidu.com",
"个性链接2" : "https://www.baidu.com"
}
},
"styles": {
"website": "styles/website.css",
"ebook": "styles/ebook.css",
"pdf": "styles/pdf.css",
"mobi": "styles/mobi.css",
"epub": "styles/epub.css"
}
}
2
3
4
5
6
7
8
9
10
11
12
13
14
15
16
17
18
19
20
21
22
23
24
25
26
27
28
29
30
31
32
33
# book.json中一些主要参数
title 标题
author 作者
description 描述,对应gitbook网站的description
language 使用的语言,
zh-hans是简体中文,会对应到页面的<html lang="zh-hans" >structure 指定 Readme、Summary、Glossary 和 Languages 对应的文件名,下面是这几个文件对应变量以及默认值:
Variable Description structure.readmeReadme file name (defaults to README.md)structure.summarySummary file name (defaults to SUMMARY.md)structure.glossaryGlossary file name (defaults to GLOSSARY.md)structure.languagesLanguages file name (defaults to LANGS.md)比如想把readme文件个名字,则可以使用如下配置
"structure": {
    "readme": "introduction.md"
},
2
3
使用这个配置后,gitbook服务就不会找readme文件,而去找introduction文件当项目说明,这样就可以把readme文件完全当成代码仓库说明文档了。
- plugins 使用的插件列表,所有的插件都在这里写出来,然后使用
gitbook install来安装。 - pluginsConfig 插件的配置信息,如果插件需要配置参数,那么在这里填写。
"links" : {
    "sidebar" : {
        "个性链接1" : "https://www.baidu.com"
    }
}
2
3
4
5
styles 自定义页面样式,各种格式对应各自的css文件
"styles": {
    "website": "styles/website.css",
    "ebook": "styles/ebook.css",
    "pdf": "styles/pdf.css",
    "mobi": "styles/mobi.css",
    "epub": "styles/epub.css"
}
1
2
3
4
5
6
7
# 配置默认主题
默认的主题可以通过配置来做一下效果。
比如侧边栏菜单显示标题数字,可以在配置文件的pluginsConfig参数中写入如下字段:
{
    "pluginsConfig": {
        "theme-default": {
            "showLevel": true
        }
    }
}
2
3
4
5
6
7
# gitbook插件
GitBook 插件: http://gitbook.zhangjikai.com/plugins.html
Gitbook 使用教程: https://einverne.github.io/gitbook-tutorial/
推荐12个实用的gitbook插件: https://blog.csdn.net/weixin_37865166/article/details/91899788