# Nginx从入门到放弃04-反向代理、正向代理、负载均衡
通过前面几篇的文章,我们知道nginx最主要的功能之一可以做负载均衡器、正向代理和反向代理,今天我们就来学习如何利用nginx配置
笔者把自己总结的文档分为几遍,合集在 https://g.xgss.net/nginx/

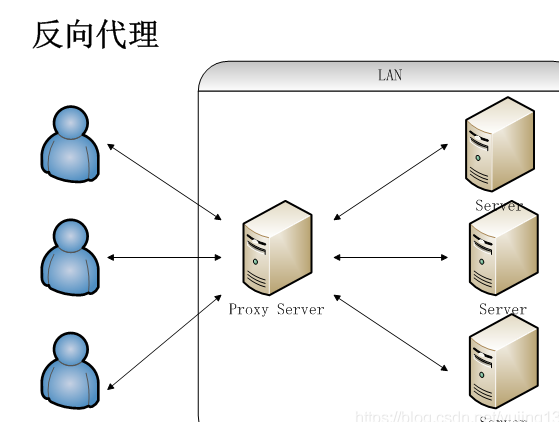
# 反向代理
局域网中的电脑用户想要直接访问网络是不可行的,只能通过代理服务器来访问,这种代理服务就被称为正向代理。
单台服务器nginx配置如下
server {
	listen       80;
	server_name  www.test.com test.com;
	error_log /data/wwwroot/log/www.test.com-error.log;
	access_log /data/wwwroot/log/www.test.com-access.log main_zdy;
	root /www/wwwroot/web/test;
	if ($host = 'test.com') {
        	rewrite ^/(.*)$ http://www.test.com/$1 permanent;
    	}
	location / {
                index  index.html index.htm index.php;
        }
	location ~ .*\.(php|php5)?$	{
                proxy_pass      http://192.168.1.10:8080;
                proxy_redirect off;
                proxy_set_header Host $host;
                proxy_set_header X-Real-IP $remote_addr;
                proxy_set_header X-Forwarded-For $proxy_add_x_forwarded_for;
        }
}
2
3
4
5
6
7
8
9
10
11
12
13
14
15
16
17
18
19
20
将php的文件代理给192.168.1.10:8080端口来处理,这就是反向代理,nginx只做分发处理。
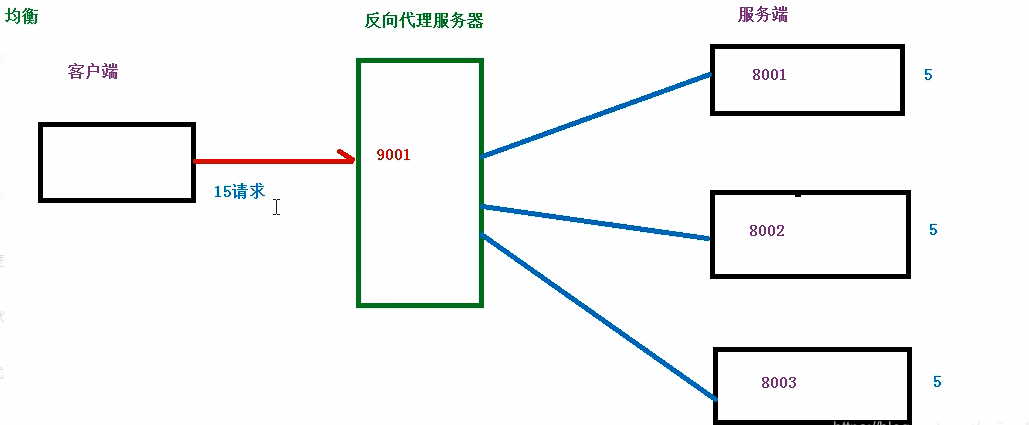
随着业务量和计算量增加,如果192.168.1.10:8080,超出本身的最大算力,这是就要增加硬件配置,单台服务器性能总会有瓶颈,这时候就需要用到负载均衡。
# 负载均衡
负载均衡,一般包含两方面的含义。一方面是,将单一的重负载分担到多个网络节点上做并行处理,每个节点处理结束后将结果汇总返回给用户,这样可以大幅提高网络系统的处理能力;第二个方面的含义是,将大量的前端并发访问或数据流量分担到多个后端网络节点上分别处理,这样可以有效减少前端用户等待响应的时间。
# 一、负载均衡的作用
# 1、转发功能
按照一定的算法【权重、轮询】,将客户端请求转发到不同应用服务器上,减轻单个服务器压力,提高系统并发量。
# 2、故障移除
通过心跳检测的方式,判断应用服务器当前是否可以正常工作,如果服务器期宕掉,自动将请求发送到其他应用服务器。
# 3、恢复添加
如检测到发生故障的应用服务器恢复工作,自动将其添加到处理用户请求队伍中。
# Nginx实现负载均衡
# 1、轮询法(默认)
将请求按顺序轮流地分配到后端服务器上,它均衡地对待后端的每一台服务器,而不关心服务器实际的连接数和当前的系统负载。
upstream myservers {
    server 192.168.20.182:8080;
    server 192.168.20.183:8080;
}

在站点配置,以下均相同配置
location ~ .*\.(php|php5)?$	{
                proxy_pass      http://myservers;  #反向代理
                proxy_redirect off;
                proxy_set_header Host $host;
                proxy_set_header X-Real-IP $remote_addr;
                proxy_set_header X-Forwarded-For $proxy_add_x_forwarded_for;
   }
2
3
4
5
6
7
8
9
10
11
12
13
upstream myservers {
    server 11.22.333.11:6666 weight=1;
    server 11.22.333.44:5555 weight=2;
    server 11.22.333.22:8888 down;
    server 11.22.333.33:8888 backup;
}
2
3
4
5
6
down 表示单前的server临时参与 weight 默觉得1.weight越大,负载的权重就越大 backup:其他全部的非backup机器down或者忙的时候,请求backup机器。所以这台机器压力会最轻
# 2、源地址哈希法
根据获取客户端的IP地址,通过哈希函数计算得到一个数值,用该数值对服务器列表的大小进行取模运算,得到的结果便是客服端要访问服务器的序号。采用源地址哈希法进行负载均衡,同一IP地址的客户端,当后端服务器列表不变时,它每次都会映射到同一台后端服务器进行访问。
upstream myservers {
    ip_hash;
    server 192.168.20.182:8080;
    server 192.168.20.183:8080;
}
2
3
4
5
# 3、随机法
通过系统的随机算法,根据后端服务器的列表大小值来随机选取其中的一台服务器进行访问。
upstream myservers {
    server 192.168.20.181:8080 weight=2;
	server 192.168.20.182:8080 weight=3;
	server 192.168.20.183:8080 weight=4;
}
2
3
4
5
# 4、加权轮询法
不同的后端服务器可能机器的配置和当前系统的负载并不相同,因此它们的抗压能力也不相同。给配置高、负载低的机器配置更高的权重,让其处理更多的请;而配置低、负载高的机器,给其分配较低的权重,降低其系统负载,加权轮询能很好地处理这一问题,并将请求顺序且按照权重分配到后端。
upstream myservers {
    # weight=3表示权重为3,每访问5次就有3次访问181的服务
	server 192.168.20.181:8080 weight=3;
	server 192.168.20.182:8080;
	server 192.168.20.183:8080;
}
2
3
4
5
6
# 5、加权随机法
与加权轮询法一样,加权随机法也根据后端机器的配置,系统的负载分配不同的权重。不同的是,它是按照权重随机请求后端服务器,而非顺序。
upstream myservers {
    server 192.168.20.181:8080 weight=2;
	server 192.168.20.182:8080 weight=3;
	server 192.168.20.183:8080 weight=4;
}
2
3
4
5
# 6、最小连接数法
由于后端服务器的配置不尽相同,对于请求的处理有快有慢,最小连接数法根据后端服务器当前的连接情况,动态地选取其中当前积压连接数最少的一台服务器来处理当前的请求,尽可能地提高后端服务的利用效率,将负责合理地分流到每一台服务器。
按后端服务器的响应时间来分配请求,响应时间短的优先分配
upstream myservers {
	server 192.168.20.182:8080;
	server 192.168.20.183:8080;
	fair;
}
2
3
4
5
# 正向代理
局域网中的电脑用户想要直接访问网络是不可行的,只能通过代理服务器来访问,这种代理服务就被称为正向代理。

# nginx配置正向代理
server {
        listen 18081;
        server_name _;
        location / {
        	resolver 8.8.8.8;
        	proxy_pass $scheme://$host$request_uri;
        }
}
2
3
4
5
6
7
8
上面的配置只能代理http协议,现在大多网站都是https协议,只配置上面是不行的,需要配置https代理。
在火狐安装代理FoxyProxy插件
访问HTTP站点:

访问HTTPS的站点是会报错

# HTTPS的正向代理
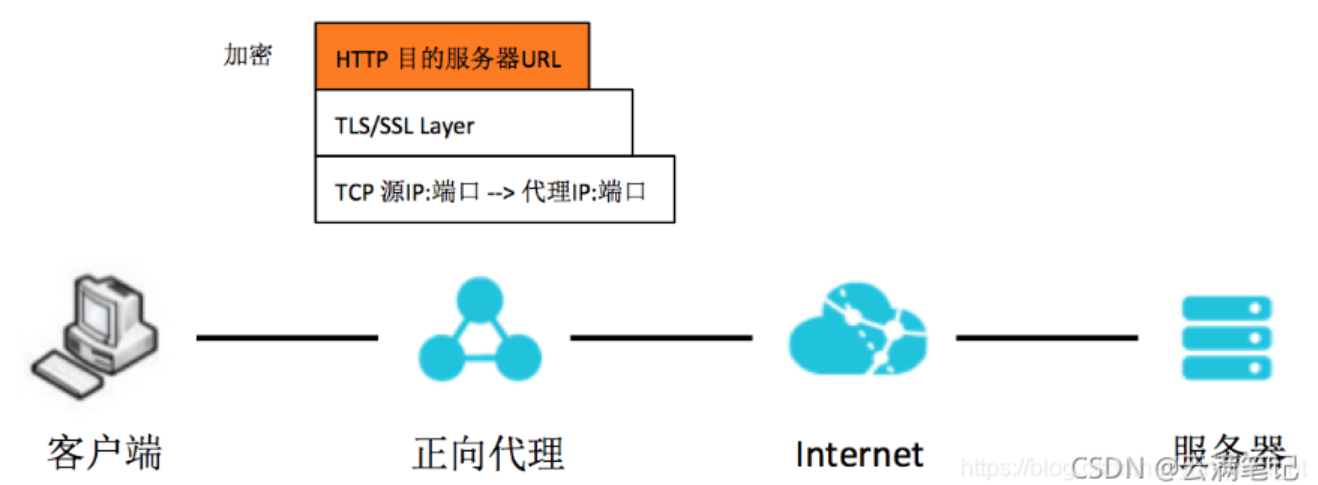
作为反向代理时, 代理服务器通常终结 (terminate) HTTPS 加密流量, 再转发给后端实例。HTTPS 流量的加解密和认证过程发生在客户端和反向代理服务器之间。
而作为正向代理在处理客户端发过来的流量时, HTTP 加密封装在了 TLS/SSL 中, 代理服务器无法看到客户端请求 URL 中想要访问的域名, 如下图。所以代理 HTTPS 流量, 相比于 HTTP, 需要做一些特殊处理。
nginx安装ngx_http_proxy_connect_module模块,通过编译安装
# 安装插件
将插件上传到/data/software,安装可以参考Nginx从入门到放弃01。
# cd /data/software
# git clone https://gitee.com/web_design_of_web_frontend/ngx_http_proxy_connect_module.git

删除之前安装的nginx
# nginx -s stop
# rm -rf /data/nginx/*
2
3
4
5
6
# 设置参数,编译模块
对于新安装的环境, 参考正常的安装步骤和安装这个模块的步骤, 把对应版本的 patch 打上之后, 在 configure 的时候加上参数 --add-module=/path/to/ngx_http_proxy_connect_module, 示例如下:
# cd /data/software/nginx-1.22.0

# ./configure --prefix=/data/nginx \
--with-file-aio \
--with-http_auth_request_module \
--with-http_ssl_module \
--with-http_v2_module \
--with-http_realip_module \
--with-http_addition_module \
--with-http_xslt_module=dynamic \
--with-http_geoip_module=dynamic \
--with-http_sub_module \
--with-http_dav_module \
--with-http_flv_module \
--with-http_mp4_module \
--with-http_gunzip_module \
--with-http_gzip_static_module \
--with-http_random_index_module \
--with-http_secure_link_module \
--with-http_degradation_module \
--with-http_slice_module \
--with-http_stub_status_module \
--with-http_perl_module=dynamic \
--with-pcre \
--with-pcre-jit \
--with-stream=dynamic \
--with-stream_ssl_module \
--with-threads \
--add-module=/data/software/ngx_http_proxy_connect_module

# make && make install
2
3
4
5
6
7
8
9
10
11
12
13
14
15
16
17
18
19
20
21
22
23
24
25
26
27
28
29
30
31
32
到这一步,make && make install 一直报错,找了很久的原因也没有解决,有知道的朋友留言说一下。所以HTTPS的代理也就。。。
src/http/ngx_http_request.h:47:0: error: "NGX_HTTP_CONNECT" redefined [-Werror]
 #define NGX_HTTP_CONNECT                   0x10000
 ^
src/http/ngx_http_request.h:44:0: note: this is the location of the previous definition
 #define NGX_HTTP_CONNECT                   0x00010000
 ^
src/http/ngx_http_request.h:439:39: error: duplicate member ‘connect_host’
     ngx_str_t                         connect_host;
                                       ^
src/http/ngx_http_request.h:440:39: error: duplicate member ‘connect_port’
     ngx_str_t                         connect_port;
                                       ^
src/http/ngx_http_request.h:441:39: error: duplicate member ‘connect_port_n’
     in_port_t                         connect_port_n;
                                       ^
src/http/ngx_http_request.h:442:39: error: duplicate member ‘connect_host_start’
     u_char                           *connect_host_start;
                                       ^
src/http/ngx_http_request.h:443:39: error: duplicate member ‘connect_host_end’
     u_char                           *connect_host_end;
                                       ^
src/http/ngx_http_request.h:444:39: error: duplicate member ‘connect_port_end’
     u_char                           *connect_port_end;
                                       ^
src/http/ngx_http_request.h:448:39: error: duplicate member ‘connect_host’
     ngx_str_t                         connect_host;
                                       ^
src/http/ngx_http_request.h:449:39: error: duplicate member ‘connect_port’
     ngx_str_t                         connect_port;
                                       ^
src/http/ngx_http_request.h:450:39: error: duplicate member ‘connect_port_n’
     in_port_t                         connect_port_n;
                                       ^
src/http/ngx_http_request.h:451:39: error: duplicate member ‘connect_host_start’
     u_char                           *connect_host_start;
                                       ^
src/http/ngx_http_request.h:452:39: error: duplicate member ‘connect_host_end’
     u_char                           *connect_host_end;
                                       ^
src/http/ngx_http_request.h:453:39: error: duplicate member ‘connect_port_end’
     u_char                           *connect_port_end;
                                       ^
cc1: all warnings being treated as errors
make[1]: *** [objs/src/http/ngx_http.o] Error 1
make[1]: Leaving directory `/home/data/software/nginx-1.22.0'
make: *** [build] Error 2
2
3
4
5
6
7
8
9
10
11
12
13
14
15
16
17
18
19
20
21
22
23
24
25
26
27
28
29
30
31
32
33
34
35
36
37
38
39
40
41
42
43
44
45
46
对于已经安装编译安装完的环境, 需要加入以上模块, 步骤如下:
# 停止 NGINX 服务
# systemctl stop nginx
# 备份原执行文件
# cp /usr/local/nginx/sbin/nginx /usr/local/nginx/sbin/nginx.bak
# 在源代码路径重新编译
# cd /usr/local/src/nginx-1.16.0
./configure \
--user=www \
--group=www \
--prefix=/usr/local/nginx \
--with-http_ssl_module \
--with-http_stub_status_module \
--with-http_realip_module \
--with-threads \
--add-module=/root/src/ngx_http_proxy_connect_module
# make
# 不要 make install
# 将新生成的可执行文件拷贝覆盖原来的 nginx 执行文件
# cp objs/nginx /usr/local/nginx/sbin/nginx
# /usr/bin/nginx -V
nginx version: nginx/1.16.0
built by gcc 4.8.5 20150623 (Red Hat 4.8.5-36) (GCC)
built with OpenSSL 1.0.2k-fips  26 Jan 2017
TLS SNI support enabled
configure arguments: --user=www --group=www --prefix=/usr/local/nginx --with-http_ssl_module --with-http_stub_status_module --with-http_realip_module --with-threads --add-module=/root/src/ngx_http_proxy_connect_module
2
3
4
5
6
7
8
9
10
11
12
13
14
15
16
17
18
19
20
21
22
23
24
25
配置nginx正向代理。
#正向代理
server{
	resolver 114.114.114.114;
	resolver_timeout 30s;
    listen 8888;
	proxy_connect;                          #启用 CONNECT HTTP方法
	proxy_connect_allow            443 80;  #指定代理CONNECT方法可以连接的端口号或范围的列表
	proxy_connect_connect_timeout  20s;     #定义客户端与代理服务器建立连接的超时时间
	proxy_connect_read_timeout     20s;     #定义客户端从代理服务器读取响应的超时时间
	proxy_connect_send_timeout     20s;     #设置客户端将请求传输到代理服务器的超时时间

	location / {
		proxy_pass $scheme://$http_host$request_uri;
	}

}
2
3
4
5
6
7
8
9
10
11
12
13
14
15
16