# Linux使用mail配合smtp发送邮件
由于工作需要结合shell脚本需要发送邮件通知,linux自带的mail可以实现外部smtp发邮件。不需要本地配置postfix,sendmail邮件服务器。
本文教程包含25端口发送邮件和mail使用465端口加密发邮件,mail基本命令发送邮件三个知识点,测试系统是centos7
# 安装工具
#  yum -y install mailx
#  yum -y install sendmail

centos6
# /etc/init.d/sendmail start
# chkconfig sendmail on

centos7
systemctl enable sendmail
2
3
4
5
6
7
8
9
关闭其他的邮件工具
# systemctl stop sendmail
# systemctl stop postfix
2
# 开启邮箱imap/smtp服务
我这里使用的是163的邮箱,步骤如下:
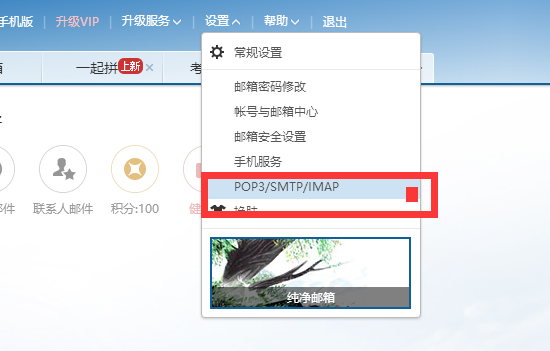
1.登录邮箱后,点击页面顶部的“设置”菜单,在下拉框中点击“POP3/SMTP/IMAP”项
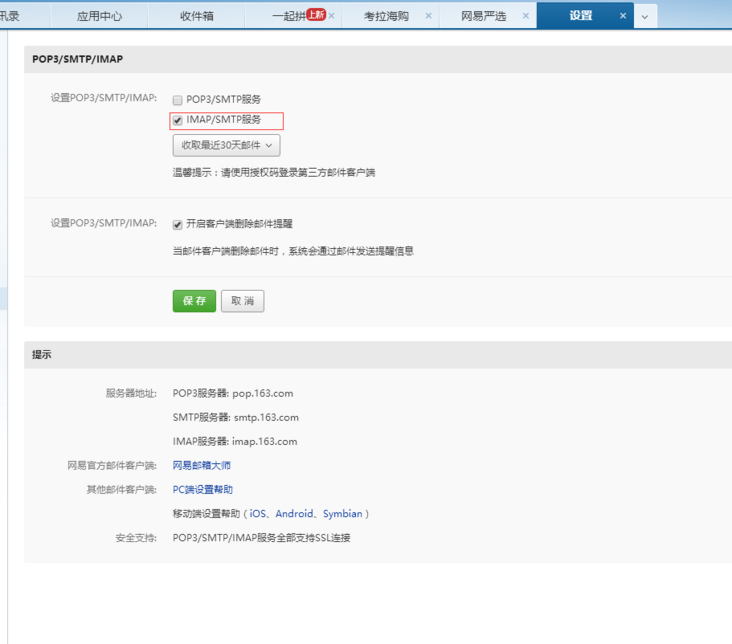
2.进入到如下页面,勾选IMAP/SMTP服务项,根据步骤完成即可(由于我这里已经开启过,就不再演示了。初始勾选后会让你填写手机号码,发送验证码,成功填写后,会让你输入授权码,这个是作为smtp登录的密码使用的,详情请看163的smtp说明)
配置发送的邮箱和密码,注意不是你的邮箱登录密码!
# vi /etc/mail.rc

在底部添加:
set from="xxx@163.com"
set smtp=smtp.163.com
set smtp-auth-user=xxx@163.com
set smtp-auth-password=自己填写的授权码
set smtp-auth=login
2
3
4
5
6
7
8
9
# 测试发送
echo -e "你好!n我来看看你n哈哈" | mail -s "测试邮件" shoujianren@163.com

mail  -s "`date +%F-%T`" shoujianren@163.com </tmp/messages.txt

echo -e "你好!\n我来看看你\n哈哈" | mail -s "测试邮件" xxx@163.com
2
3
4
5
6
7
有的云服务器商封了25端口。
1.开工单,让客服把25号端口开通,例如阿里云TCP 25端口解封申请 https://help.aliyun.com/knowledge_detail/56130.html
2.使用加密端口发送邮件。
# mail使用465端口加密发邮件
今天由于服务需求,需要服务器需要发送邮件;但是不论用什么办法,发送邮件总是失败;最终发现原因:阿里云实例服务器默认禁止了25端口;
# 关闭其它的邮件工具
# systemctl stop sendmail
# systemctl stop postfix
2
# 安装mailx
yum install mailx
# 开启smtp
参考上一步
# 请求数字证书
这里用的163邮箱,所以向163请求证书
# mkdir /root/.certs

# echo -n | openssl s_client -connect smtp.163.com:465 | sed -ne '/-BEGIN CERTIFICATE-/,/-END CERTIFICATE-/p' > /root/.certs/163.crt

# certutil -A -n "GeoTrust SSL CA" -t "C,," -d /root/.certs -i /root/.certs/163.crt

# certutil -A -n "GeoTrust Global CA" -t "C,," -d /root/.certs -i /root/.certs/163.crt

# certutil -A -n "GeoTrust SSL CA - G3" -t "Pu,Pu,Pu" -d /root/.certs/./ -i /root/.certs/163.crt

# ls /root/.certs/
163.crt  cert8.db  key3.db  secmod.db

# certutil -L -d /root/.certs

Certificate Nickname                                         Trust Attributes
                                                             SSL,S/MIME,JAR/XPI

GeoTrust SSL CA                                              P,P,P
2
3
4
5
6
7
8
9
10
11
12
13
14
15
16
17
18
19
# 配置/etc/mail.rc
# vim /etc/mail.rc

set from=xxx@163.com #之前设置好的邮箱地址
set smtp="smtps://smtp.163.com:465" #邮件服务器
set smtp-auth-user=xxx@163.com #之前设置好的邮箱地址
set smtp-auth-password=xxxx #授权码
set smtp-auth=login #默认login即可
set ssl-verify=ignore #ssl认证方式
set nss-config-dir=/root/.certs #证书所在目录
2
3
4
5
6
7
8
9
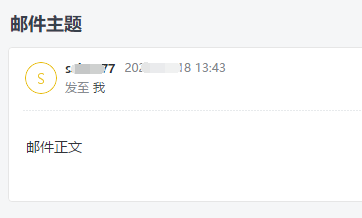
# 发送邮件测试
# echo "邮件正文" | mail -s "邮件主题" xxx@163.com
邮件发送成功
# mail基本命令发送邮件
1.标题为"test"内容为空的邮件,容易被邮箱服务判为垃圾邮件。
mail -s "test" username2@163.com
2.以文件为内容作为邮件正文:
echo "222222222" > /root/mail1
mail -s test username2@163.com < /root/mail1
mail -s test2 username1@163.com,username3@163.com < /root/mail1
2
3
3.使用管道进行邮件发送
echo "hello,username3...." | mail -s "hello" username3@163.com
4.发送附件 在linux下使用mail命令发送附件也很简单,不过首先需要安装uuencode软件包,这个程序是对二进制文件进行编码使其适合通过邮件进行发送,直接使用centos的yum源可能找不到uuencode命令的包sharutils,我这里使用了网易Yum源。
# yum -y install sharutils

# uuencode /root/mail1 | mail -s "fujian" xxxx@163.com < /root/file1
2
3
4
5、使用外部smtp来发送邮件
# vi /etc/mail.rc          #文末添加以下
set from=username1@163.com
smtp=smtp.163.com
set smtp-auth-user=username1@163.com
smtp-auth-password=password
smtp-auth=login

# source /etc/mail.rc	【本人测试,不需要这步即可】
# mail -s "testmail" username@163.com < /etc/passwd
2
3
4
5
6
7
8
9